Steps:
1. Choose a company type.
2. Choose a color harmony.
3. Create a logo.
4. Choose a box template (anything you would like)!
5. Open the template in Illustrator to create ALL sides of the item
https://www.google.com/search?q=box+templates&safe=strict&rlz=1C1GCEU_enUS821US821&source=lnms&tbm=isch&sa=X&ved=0ahUKEwjhnL-0sO3fAhXEx4MKHZJrB24Q_AUIDigB&biw=1920&bih=969
6. We will print the template on good paper and fold the actual box.
7. We will create a poster advertisement to accompany your box design.
*Consider making additional items other than just the box
*Consider making it an interactive graphic design
http://graphicdesisn2lessons.weebly.com/interactive-graphics.html
-add a light
-add a moving part
-add a folding door
-add fabric
-sew on your design
-put it in a sleeve
-add transparency
Create a google doc for planning in your folder
PLANNING PHASES!
1. What is your design going to be about?
Include:Title/ Name of Product/ Name of Company etc. #1 in VH
Common Information.
What should I know about what I am looking at? What is important?
Describe your design/purpose:
2. WHAT STYLE IS YOUR POSTER GOING TO BE IN? CHOOSE A STYLE AND ADD A REFERENCE IMAGE HERE!
Look up more examples of this style online to best construct your idea!
3. FIND A REFERENCE EXAMPLE For Visual hierarchy/ division of space if your reference doesn't contain this:
4. DRAW A SKETCH TO PLAN OUT YOUR DESIGN LAYOUT!
Remember:
Unify (with style choices)
DIVIDE THE SPACE! (use the rule of thirds)
Choose a color harmony to follow closely! NO MORE THAN 4 + shades and tints!
Create a visual hierarchy/ order for the viewer to look (from most important to least)
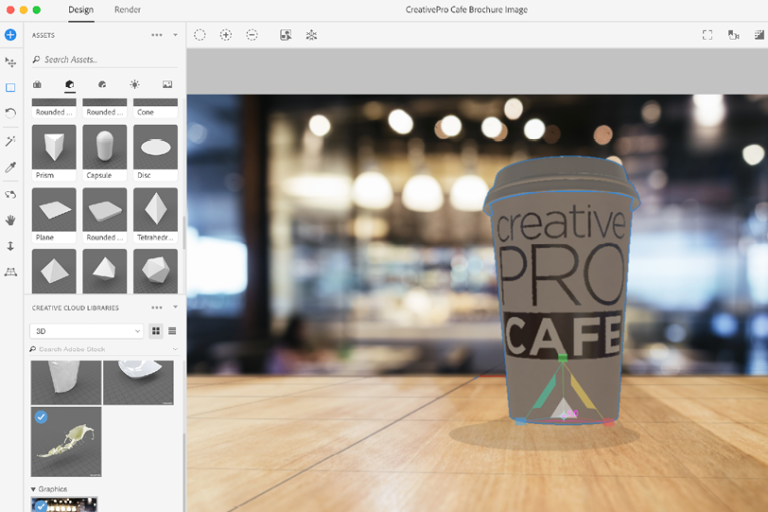
The Workflow
The basic workflow in Dimension CC is as follows:
Place a 3D model on the canvas. You can choose from several models built into Dimension CC, download a model from Adobe Stock or a CC Library, or place one (saved on the OBJ format) from another source, like Turbosquid.com.
Apply materials to the object. 3D models are just vector objects whose surfaces are composed of tiny polygons (technically triangles). They have no appearance until colors, graphics, and materials are applied to the surfaces. Dimension CC has many different materials built in, including glass, metal (several kinds), plastic, wood, concrete, cardboard, granite, wicker, and even beer! You can customize any material by changing the values of properties like base color, glow, opacity, metallic luster, translucence, and density. And you can download many more materials from Adobe Stock or third-party sources (in MDL format).
Add a background image. It’s not necessary to put a background photo behind your 3D objects, but it is the best way to integrate them into a real-world scene. And with one click, Dimension CC can analyze the perspective and lighting in a background image and apply these factors to the scene.
Transform the model to fit the image. To make a convincing composite image, you’ll often need to scale, rotate, and move models into place.
Adjust the view. To change your view of the 3D models you place on the canvas, you can use camera tools to zoom in or out, pan in any direction, or rotate the scene. There is also a Horizon tool for adjusting the perspective.
Add or adjust lighting. Dimension CC offers two kinds of lighting that you can apply and customize: environment lighting, which is created by placing an image around the object, and using the colors and details of the image to simulate light reflecting off the surroundings and onto the object. The second kind of lighting is sunlight. You can control the angle, intensity, and height of the sun, as well as the amount of cloudiness to simulate any time of day or type of weather.
Render the image. The final step is to output your composition to either a PNG or a layered Photoshop file. There are three quality levels to choose from. Note that high quality images can sometimes take a very long time to render.
Tools to know!
|
OBJECT
Choosing your object: Download more objects free in adobe stock or from my home page!
|

|
MOVE
Use the colored cross hairs to drag the object in the direction you choose.

HORIZON LINE
Adjust the horizon line so your object sits on your background image.

LARGER OR SMALLER
Again make sure you use the colored cross hairs!
LIGHT & SHADOW


RENDER

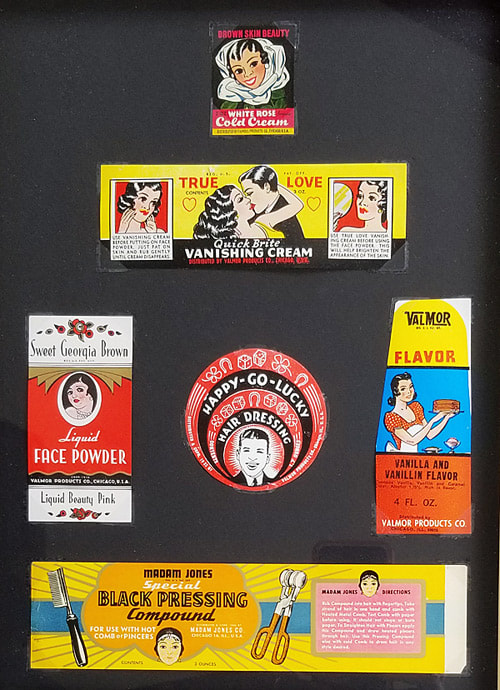
Artists to Know!:
Charles Dawson- Graphic Designer
Best known for his illustrated advertisements, Charles Dawson (Charles Clarence Dawson) was an influential Chicago designer and artist through the 1920s and 30’s. He was born in 1898 in Georgia and went on to attend Booker T. Washington’s Tuskegee Institute. After two years there, he left when he became the first African American to be admitted into the Arts Students League of New York!


|
|
